8 min to read.
Abstract
Transitive routing requirement is common reality in
every “Enterprise Grade” Azure Implementation!
Simplest way to connect two Azure VNet is to use Azure Vnet
Peering. If I have 3 VNETs peered with each other; example A <> B
<> C. I want Azure VM in A Vnet to talk to Azure VM in C Vnet then it
wont work; because A and C VNet are not peered directly to each other; but through
B Vnet.
Fact that VM in A vnet not able to reach VM
in C Vnet is called as “Transitive Routing Problem”.
How do I solve it?
There are many solutions. Simplest way to solve
transitive VNET peering problem would be, to create an “IP Forwarder using Azure
Ubuntu VM” in B Vnet.
Let’s start!
Problem statement in detail
As you can see in above diagram I have 3 Azure Virtual
Networks named as
1. ContosoDC VNET
2. UbuntuFwVNET - you can also name it as Transit VNET.
3. ContosoServer VNET
I have provisioned subnets as shown in the diagram. All
VNETs are peered bi-directional as described below –
1. Contoso Dc VNET < peered to> Transit VNET
2. Contoso Server VNET < peered to> Transit VNET
Azure VNET Peering is bidirectional. Needless to say, if
Contoso DC VNET peered to Transit VNET means; Transit VNET will also require
peering to Contoso DC VNET to allow them communicate each other.
However, ContosoServer VNET
and ContosoDC VNET are not peered with each other.
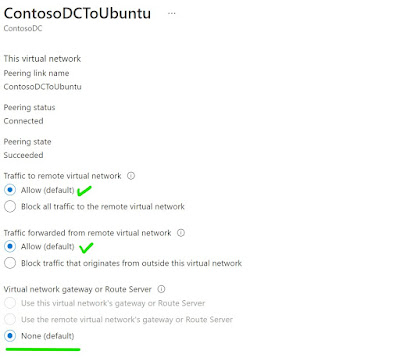
Note – None of these VNETs
are having VNET Gateway or ExpressRoute Gateway in it. So when you peer make
sure you choose None for gateway options as shown below [click to get better
view].
 |
I have 2 windows VMS and one Ubuntu VM [with Single NIC]
in Transit VNET. One of the windows VM has public IP and rest of the two VMs do
not have public IP.
Problem statement - I
want to allow RDP from ContosoDCVM [10.11.0.4] to ContosoServer VM [10.10.0.4].
How to go to unknown destination - User Defined Routes - UDR
ContosoDC and Contoso Server VNET are not peered. This
means both VNETs do not know each other’s address ranges.
When from an Azure VNET you want to send traffic to
another unknown Azure VNET, you use Azure User Defined Route Tables aka UDR and
provide the next hop to an appliance/ VM/ NVA/ Firewall/ Router/ or forwarder
which will then take care of sending traffic to correct destination.
In our case the NVA is our ubuntu Azure VM. Therefore from
both VNETs we need to send the traffic to Ubuntu VM IP. Then ubuntu VM will
eventually DNAT [Destination NAT] the incoming traffic to its correct
destination.
UDR on Contoso Server Subnet as below – [click to get
better view]
UDR on Contoso DC Subnet as below – [click to get better
view]
Configure Ubuntu as IP Forwarder
For this there are two settings. One on Network
Interface of Ubuntu VM from Azure portal and one inside the OS of Ubuntu
itself.
Go to NIC associated to Ubuntu VM and enable “IP
Forwarding” as shown below [click to get better view] -
Take SSH into Ubuntu VM and run below commands to enable
the IP forwarding inside OS.
$ sudo vim /etc/sysctl.conf
Uncomment the below line – [remove #] and then press Esc
and type :wq to save the file.
net.ipv4.ip_forward=1
Run below command to confirm if the change is correct –
$ sudo sysctl -p
This completes the configuration of IP forwarding for
Ubuntu VM.
NAT the incoming traffic
NATing is of two types.
Source NAT – SNAT – to be
used when you want to change the sender’s address.
Destination NAT – DNAT – to be
used when you want to change the destination address.
Example, Web application is hosted on behind the
firewall. Firewall VM has public IP and actual application runs on web server which
has private IP. In this case, incoming web request reaches to public IP of
firewall and get forwarded to web server private IP. This is translation from
public IP to private IP. This is DNAT.
In our case we need to perform DNAT as
destination is not known to each of the VNET. Only Transit VNET knows both VNETs.
Also in our case DNAT will be for private IP to private IP, as there is no public
IP in picture here.
DNAT can be achieved using iptables in PREROUTING and
POSTROUTING chaining. To know more refer this awesome link - https://www.karlrupp.net/en/computer/nat_tutorial.
In our case we need below DNAT chaining –
1. PREROUTING
- If source is 10.11.0.4 then DNAT to 10.10.0.4:3389
2. PREROUTING
- If source is 10.10.0.4 then DNAT to 10.11.0.4:3389
3. POSTROUTING
- For all DNAT, use IP address of Ubuntu VM as source
The respective commands are as follows – run it on Ubuntu VM –
$ sudo iptables -t nat -A PREROUTING -i eth0 -p tcp -s
10.11.0.4 --dport 3389 -j DNAT --to-destination 10.10.0.4:3389
$ sudo iptables -t nat -A PREROUTING -i eth0 -p tcp -s
10.10.0.4 --dport 3389 -j DNAT --to-destination 10.11.0.4:3389
$ sudo iptables -t nat -A POSTROUTING -o eth0 -j
MASQUERADE
These iptables configuration are not persistent over
reboots. So we need to use “iptables-persistent” module to make it happen.
Run below commands –
$ sudo apt-get update
$ sudo apt install iptables-persistent
On running above command you will have to enter “Yes”
twice. This completes the installation of iptables-persistent module.
Then read all iptables configuration we perform and pipe [or copy paste] to rules files. Then add this rules files path in rc.local which eventually will make our iptables configuration persistent over reboot of ubuntu machine. Run below commands –
$ sudo iptables-save > /etc/iptables/rules.v4
$ sudo vim /etc/rc.local
Add below line in /etc/rc.local file and then save the
file by pressing Esc -> :wq.
/sbin/iptables-restore < /etc/iptables/rules.v4
Reboot the machine by typing below command –
$ sudo reboot
This completes the configuration of iptables and NAT on ubuntu machine.
Confirm the connectivity
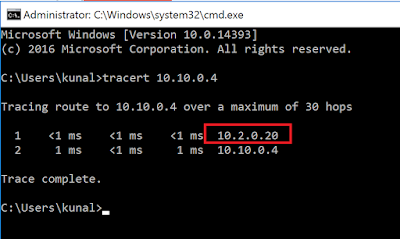
Login to Contoso server VM over public IP. You can leverage Azure Bastion, Jump VM, or any other option for this. After login lets confirm if the traffic is flowing to ContosoDc VM through Ubuntu VM. For this I ran tracert command and output shows that the traffic does flow through ubuntu VM as shown below – [click to get better view] –
Similarly I could see return traffic from ContosoDC VM
to ContosoServer VM was flowing through ubuntu VM – [click to get better view]
You should be able to take RDP between the VMs. Post RDP
I checked the source in event viewer of both windows VM and I could see the
source IP as ubuntu IP from which DNAT occurs.
Source IP of RDP can be viewed from below path in Event
viewer - Event Viewer > Applications and Services Logs > Microsoft >
Windows > TerminalServices-LocalSessionManager > Operational
Screenshot of ContosoDc machines – [click to get better
view]
This concludes how an Azure Ubuntu VM can be configured as
“IP Forwarder” to achieve Transitive routing in Azure VNET Peering.
What are the other ways to achieve transitive routing in Azure VNet peering?
What we did with Ubuntu is, we built IP forwarding out
of it from scratch. This is readily available with leading firewall and routing
devices such as PaloAlto, CheckPoint, Barracuda etc. The only difference is
those devices will come with licenses cost. Ubuntu VM we built does not incur
any licenses cost.
How to achieve Transitive routing in peered VNet using Azure Firewall?
This possible using Azure Firewall.
Deploy Azure firewall in Transit VNET. You just need to allow traffic from ContosoDC to Contoso Server VNET and vice versa as a Firewall Network rule. Configure the UDR on both VNETs with next hop to Firewall private IP and you are done.
Conclusion
Hope this article helped to design IP forwarder using
simple Azure Ubuntu VM to solve your Transitive Routing needs.
Happy Peering!!
A humble request!
Internet is creating a lot of digital garbage. If you feel this a
quality blog and someone will definitely get benefited, don't hesitate to hit
share button present below. Your one share will save many precious hours of a
developer. Thank you.
Next Related Posts
Transitive Routing with 4 VNETs and Azure Firewall
Azure
Virtual Machines – real world frequently asked questions – not easily answered.
Azure
Migration frequently asked questions, not easily answered!


