Abstract
Azure cost optimization is becoming a reality and must
do for every organization. Limiting cloud spend is top most priority for many
organizations to continue the show. While Microsoft Azure drives organizations
to perform “Digital Transformation” and “App Modernization”; the IT Heads are
finding it difficult to keep the cost low for cloud services. This does not
mean that Microsoft Azure do not offer you choices to bring your Azure cost
down rather cloud approach is meant to bring your IT cost down. However if you
are not doing smartly then obviously you are not getting most out of your Azure
journey. I have seen mainly the ignorance from IT Heads, IT admins, Cloud
Administrators and lack of knowledge [Most of the time I call it Laziness]
causing much of the problems. Microsoft Azure gives you enough choices, ways
and tools to make sure you optimize the Azure cost. Remember Azure Cost
Optimization is a journey and you have to continuously monitor it.
As always, my dear [and of course lazy] followers keep
asking to bring down Azure cost and what are the effective ways of doing it.
For you guys [and girls] I have started a dedicated page for “Azure Cost
Optimization”. On this page I will be adding the tricks and tips for Azure cost
optimization. Link of this page can be found at the end of article or on the
top.
Let’s go!
Why Azure App service for cost optimization?
How many of you have seen KeyNote of Satya Nadella held in July 2019 at Microsoft Inspire conference?
If not go watch it. Refer to below screenshot –
It was stated that in next 5 years, 500 million apps/
applications will be created. When we talk about creating so many applications definitely
major chunk will be web applications, REST API and web hosted applications. The
question where will be those applications hosted. The service which is
scalable, resilient and easy to configure will win the race. Azure App Service
exactly fits into it. Azure App Service is a platform which makes it super easy
for hosting web-based applications primarily. The current momentum of Azure App
service is also amazing.
So obviously Azure App service is the primary way of
hosting web applications and will increase exponentially in coming future. So
in essence it is important for us to know how can we save cost when we host our
applications on Azure App Service.
The costliest resource on cloud – Compute
Microsoft Azure is made of 3 basic building blocks –
Network, Storage and Compute. All services are built on top of these building
blocks. For any computing, processing , analysis you need compute power. For
Azure, “Compute” is the most costly resource as compared to Networking and
Storage. If you save on Compute then you perform major cloud cost optimization.
In Azure App service, the compute, network and storage for
your application is provided by Azure App Service Plans.
Understanding Azure App Service Plans
For simplicity you can consider App Service Plan is a service which provides you a VM on which you host your application. As App Service is PaaS you can not login/ RDP/ SSH to the VM provided by App Service Plans. So in essence when you say you are paying for Azure App service hosting, you are actually paying for App Service Plans.
App service plans provide –
1. Compute
– CPU and Memory
2. Storage
3. Network
4. Location – refers to Azure regions
2. Storage
3. Network
4. Location – refers to Azure regions
What you provide to App Service Plan is your -
1. Config
files
2. Contents
3. And code
2. Contents
3. And code
Note - Any web application
can belong to only one App Service Plan.
App Service Plan Pricing Sku, Sizes
Azure App Service Plans are offered in 6 different sizes
–
1. FREE
2. Shared
3. Basic
4. Standard
5. Premium
6. Isolated
2. Shared
3. Basic
4. Standard
5. Premium
6. Isolated
Let us understand them one by one.
FREE –
Free means free. You are not charged a single penny for running
your application with FREE tier. And of course it comes with limitation. Free
tier can run your application for only 60 CPU Min/ day. This is not 1 hour in
your watch. This is CPU running minutes. Post this your application will stop
functioning.
Shared –
Shared means you are packed with other folks. Consider
one big VM behind the scene and all Shared/ FREE App Service Plan hosted
application are grouped together and hosted inside this big VM. So you are using
a part of resources offered by this big VM. Of course there is no SLA for these
deployments and performance of the application will not be guaranteed at all. Below
diagram shows the same –
Smiley in above screenshot is your application and blue
color boxes are other applications running. So there can be other customer’s
applications running on this big VM in FREE and Shared plans and hence they are
not recommended for production deployments.
Did you catch it?
Well we discussed about FREE and Shared app service
plans and how you are offered resources in shared manner. So this strategy of running
applications in FREE and Shared mode itself can help you to save your cost of
running application in Azure App Service!!
Did you understand? Let me elaborate more!
Consider a scenario where you have a laptop and you
install IIS/ Tomcat on it. Now in this laptop you can run / host multiple web
applications inside same Tomcat/ IIS. This is what you do when you have a VM
and you deploy multiple web applications on web server [like IIS/ tomcat] inside
it. Exactly the same way FREE and Shared App service Plans are doing. They are
allowing you to host your application for testing purpose and at the same time
they allow other customers applications also run inside the same big VM offered
behind these App Service Plans.
And this strategy you can extend to
DEDICATED VMs you get in BASIC, Standard, Premium and Isolated App service plans.
Cost optimization in App Service Plans which offers dedicated VMs
Basic, Standard, Premium and Isolated App Service Plans
offer you dedicated VMs behind the scene for hosting your application and you
are never packed with other folks. So the entire VM that you get as a part of
the App service plan is completely yours!
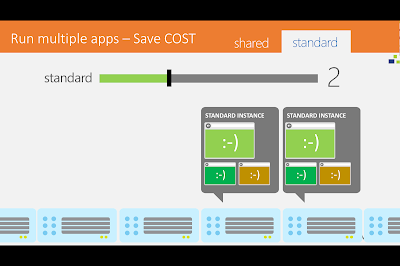
Let us take an example of Standard app Service plan. When
you deploy an application in Standard you get dedicated VM behind the scene on which
you application runs as shown –
These plans also offer you very powerful
capability of “AutoScale”. The autoscale can be configured based
on various metrics.
Important - When
you scale the app service, in essence you scale the App Service Plan only. Hence
when you say run my application with Standard App Service Plan with 2 instances
then 2 VMs will be created under same App Service Plan. On both VMs your
application will be automatically deployed without you having to do anything
[this is power of PaaS – Azure App Service]. This is shown below –
Now, see you have got a complete VM capacity [compute and
RAM] under your app service plan. So just like traditional way here also you
can run multiple applications on single app service plan. And this is the secret
of azure cost optimization in Azure App service. And When you scale, all
applications get the scale benefits. All applications will be deployed on
multiple VMs that gets provisioned inside your App Service Plan. This is shown
below –
So if you are paying let us say 100$ for running 2
instances under App Service Plan with single application, now you can run 2,3,4…N
number of applications at the same price of 100$. This is big!
Let us see how can we run multiple application in App
Service Plan from Azure portal.
Configure multiple application to run in Azure App Service Plan
First I created a resource group and then created App
service plan in Standard sku with settings as shown below –
Now we will create 2 web apps and deploy in this same
App Service Plan. To configure same app service plan for various different
application make sure that you select the same App Service Plan we created in
above step as shown below –
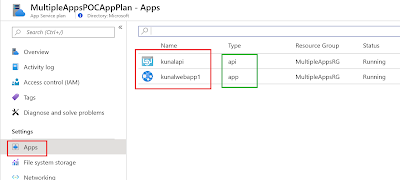
In above diagram I am mixing two different types of Apps
in same App Service Plan. I have added web app and API app in the same Azure
App Service Plan. Same can be viewed from App Service Plan as well as shown
below –
So we just saw how can you run multiple Azure App
Service type applications in Single App Service Plan.
Bonus Tip
So to save cost, shall we always run the multiple
applications in Single App Service Plan? Definitely No.
Running multiple application in single App service Plan
with multiple or single instance may not be right choice always. It is also
recommended to have different app service plan per application if –
-
Your application is resource intensive
-
Application has different scaling factors
from other apps present in the same plan
-
Or application needs different geo-graphical
location altogether.
Conclusion
And that’s it! Hope this article has given you a way to
perform Azure Cost Optimization in Azure App Service.
This is #3rd tip in Azure Cost Optimization. Please
treat this optimization page as yours and come forward to contribute. I expect
this page to become one stop solution for all Azure Cost Optimization
requirements. Refer to all other Tips - https://sanganakauthority.blogspot.com/p/azure-cost-optimization.html
Happy Azure Cost Optimization!!
A humble request!
Internet is
creating a lot of digital garbage. If you feel this a quality blog and someone
will definitely get benefited, don't hesitate to hit share button present
below. Your one share will save many precious hours of a developer. Thank you.


No comments:
Post a Comment